
I'm so happy to be guest designing today for the new release at SumMore Fun, home to Victorine Originals ! Although the new release is available also in clear, photopolymer stamp sets, I'm using the digital version today. This is also a blog hop and there are prizes involved! Woo hoo! Be sure and click the inlinkz button at the end of this post, to hop along at all the stops and leave comments, to qualify to win.
The digi set I'm working with is called Tangled Tinsel. As you can see below, I've watercolored my images for a no-line watercolor effect. This is one of my favorite techniques when working with physical stamps, so I thought it would be fun to translate to my digital stamps, as well. It's so easy to convert your digi stamps into a translucent image. Stick around for a few minutes while I show you the steps.
(FTC Disclosure: as an affiliate for various companies in the craft industry, I will receive a small commission for purchases made through my convenient affiliate links. This does not affect your purchase price.)

I took a couple screenshots and turned them into photos to help with the explanation.
As you can see from the photo below, that is my original scene, created by adding my digital elements to a Microsoft Word document. Please note, that all my instructions will reference Microsoft Word. I do have an older version, so if you use a newer program, your editing screen may look somewhat different.
If you've never worked with digital stamps but are interested in learning, you simply begin by opening a blank word document and add your downloaded digital images as "pictures". I changed my page layout size to 4" x 6", although I did print on a larger 8.5 x 11 inch piece of mixed media paper. You don't necessarily have to change your page layout to 4 x 6. I felt like it would give me a more intimate feel for how I wanted to layout my images. That's the only reason I selected that size. After printing and coloring, I did trim this down a bit in order to layer my cardstock.

If you're new to digital stamps let me share some key information. In order to arrange your images and move them around, you need to do a couple things.
1) Right click on each image and select "wrap text".
2) Next, if you want an image to be in the forefront, select "in front of text",
or
3) if you want your image to be in the background, (such as the ornaments in the background) you must select "behind text".
This enables you to move your images around. Again, it may depend on what operating program you are using.
Next, let me show you how I altered my images to achieve the translucent appearance for no-line watercoloring. In the sample below, I have one original silhouette branch and another that I turned into a translucent branch for coloring. (By the way, I did invert some of my branches for a mirror image/reverse effect.)

For transparency, click on your image to bring up the format picture button on the toolbar. Next, choose "color" and select "Set Transparent Color". A tiny drawing tool will appear and you will simply click anywhere on the black silhouette to change it to transparent. Magic!
For my ornaments, I went a step further.

I followed the same steps as above, to achieve transparency. Once that was done, I then tapped the "artistic effects" button on the toolbar and chose the "glass" setting. Again, a tiny drawing tool will appear and you simply tap on the edging of the ornament to turn into a glass effect. How cool is that? The other great thing that I love about digital stamps is you can easily change the size of your images.
Here's one VERY IMPORTANT thing you need to know. How did I color my ornament and then get the sentiment on there? To prevent the printed sentiment from bleeding during the coloring process, I printed that onto my project AFTER I did my watercoloring.
Before printing my scene to color, I lined up the sentiment, sized it how I wanted it to appear over the central ornament, then hit the "un-do" button on my toolbar, to temporarily make it disappear.
Before printing my scene to color, I lined up the sentiment, sized it how I wanted it to appear over the central ornament, then hit the "un-do" button on my toolbar, to temporarily make it disappear.

Once the scene is printed without the sentiment, do this.... hit the re-do button to place your sentiment back where you had it. In fact it may be a good idea to make a copy of your file or save your file before the next step.
Click on each item (except the sentiment) and delete it. You want the sentiment to be in the exact place it was with all the other elements removed. Now you can run your colored printable scene back through and print your sentiment perfectly onto your colored ornament! Make sure you're well familiar with which side your printer spits out images so you don't end up with the sentiment on the wrong end of your paper. You can always do a test print with the black and white images. When finished, you can always hit the re-do button to bring all your images back onto the screen. Or not, if you saved your file.
I'm sorry if I threw too much information at you! I just want to be accurate if this is something you wish to try. Now, on to some brief coloring details....
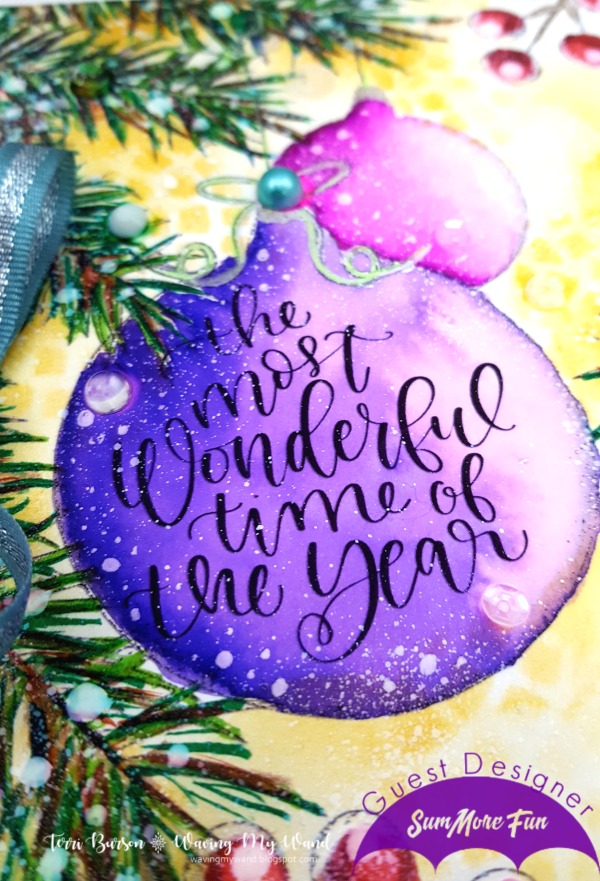
I use Strathmore mixed media exclusively for this type of project and also for watercoloring with clear or rubber stamps. It's great for watercolors and runs through my Canon printer with no problem. You can find it in the art supply section of Hobby Lobby. I've also seen it at Target. My coloring tools are the Kuretake Zig Real Clean Color brush markers. To get the faded look with a light effect on the ornaments, I used the brush markers along the inside left of the ornaments, then used a waterbrush to pull the color toward the other side. Have a paper towel handy to do some minimal blotting to further lift the diluted ink for a light effect. If you look close, you can see that I did a little stenciling as well, using Ranger Ink. I diluted some of that color with a water brush as well.
I also splattered "snow" onto my project. Dip a damp toothbrush into white acrylic paint and run your thumb across the toothbrush to splatter. Make sure you do this in a large box to prevent messing up your work space. Also, cover the sentiment so it doesn't get splattered much. You can also take the opposing end of a paint brush and dip the small round end into paint to add larger dots of snow, which is what I did for my branches.

Lastly, let your colored images dry several hours or overnight before splattering with paint. Your paper needs to be completely dry through and through. Even drying with a heat tool will not be sufficient. If you add paint splatter too soon, the white paint will literally absorb the color and you will end up with colored splatters instead of "snow". Trust me on this. If you get carried away though, you can always do some touching up with a white gel pen. Even I have problems waiting!
Check out the entire new release!

And, here's Tangled Tinsel. Isn't it awesome?

If you're interested in the coloring tools or additional products used in this project, I've provided convenient affiliate links at the end of this post. Thanks so much! I appreciate you stopping by. Make sure you visit the SumMore Fun blog as they are giving away a free paper digital pack with the purchase of the photomolymer stamp set.
Linking to these challenges:
SUPPLIES:
I’m listing the products I used throughout this post. Click on the link to go directly to the product. Where available I use compensated affiliate links which means if you make a purchase I receive a small commission at no extra cost to you. Thank you so much for your support!
 Ranger Tim Holtz Detail NIB Water Brush Shop at: Scrapbookcom |
 Ranger Inkssentials Craft Mat 15x18 Shop at: Scrapbookcom |
 Ranger Distress Ink - Fossilized Amber Shop at: Scrapbookcom |
 Signo White Uni-ball gel pen Shop at: Scrapbookcom |
 Scrapbook Adhesives by 3L EZ Grand Runner Shop at: Scrapbookcom |
 Neenah Solar White Cardstock 8.5x11 inch Shop at: Scrapbookcom |
 Scrapbook Adhesives by 3L EZ Runner Grand Refill Shop at: Scrapbookcom |
 Dina Wakley Heavy Body Acrylic Paint, white Shop at: Scrapbookcom |
 Kuretake Zig Real Clean Color Brush Markers 36 pc. Shop at: Scrapbookcom |
 Sponge daubers 10 pk Shop at: Scrapbookcom |
 Tim Holtz Mini Stencils 3 pk Set #28 Shop at: Scrapbookcom | Crackerbox & Suzy Stamps |
 28 Lilac Lane Rainbow Unicorn Shaker Mix Shop at: Scrapbookcom |
 28 Lilac Lane Craft Embellishment Kit - Let's Go Shop at: Scrapbookcom |
#summorefun #victorineoriginals #wavingmywand #digitalstamps #tangledtinsel #newrelease #coloring #watercolor #adhesives #DIY #papercrafts #cards #cardmaking #technique #kuretakezig #zigrealcleancolorbrushes #Neenah #solarwhite #scrapbooking #terriburson #rangerink #timholtz #christmas #stamps #holiday #christmascards #buttonsgaloreandmore #buttonsgalore #sparkletz #buttons #sequins #snow #strathmoreart #mixedmedia #scrapbookadhesivesby3L #rangerink #28lilaclane #stencils
 :)
:)
 :(
:(
 :))
:))
 :((
:((
 =))
=))
 =D>
=D>
 :D
:D
 :P
:P
 :-O
:-O
 :-?
:-?
 :-SS
:-SS
 :-f
:-f
 d(
d(
 :-*
:-*
 b-(
b-(
 h-(
h-(
 g-)
g-)
 5-p
5-p
 y-)
y-)
 c-)
c-)
 s-)
s-)
 d-)
d-)
 w-)
w-)
 :-h
:-h
 :X
:X
No comments:
Post a Comment
(Ignore the robot caption feature and just click submit for your comments. It's a blogger glitch) I appreciate each and every comment. Thank you so much!