
Today I have a card that features coloring with OLO Markers, paired with digital designs from Angie Blom Digital Designs. I've really enjoyed spending more time with my OLO markers, getting more comfortable with these fabulous artist markers. Scroll down for details!
(FTC Disclosure: as an affiliate for various companies in the craft industry, I will receive a small commission for purchases made through my convenient affiliate links, at no additional cost to you.)

I've used a variety of artist markers over the years and am really impressed with OLO. They have a ton of information on their website about these markers, if you want to know more. Be sure and check out their FAQ section.
For example, if you don't use the chisel portion on a marker, you can purchase the half markers. For every 2 half markers you purchase, you will receive a connector ring which connects two half markers together. So, you can have two different markers in your hand at once! Also, one half markers holds more ink than any full marker on the market. They also have patented ink flow technology.

The markers that you see in the photo above are what I used for today's project, in addition to a brown marker (OR 3.4) that didn't make it into the shot.
For blending, I find that layering colors seems to work best when I'm trying to achieve more dimension or for a shading effect.
For example, with the tent below, I used one marker, YG 2.5. I colored the entire tent with that color, then went in with more layers of the same color to deepen in certain areas. You can see the difference on the inside of the tent and along the outer edges where I deepened the color.

To create my scene I used several images from a variety of collections from Angie Blom Digital Designs:
Birch Trees Background
Camping Adventures
Deer Holiday Wishes
Mixed Media Elements 1
For the birch trees, I actually inserted two side by side elements and re-sized them by widening. I always use formatting features to bring some images to the front and some to the back. I also will change color when needed. For example, I inserted some splatter's in the snow from Angie's Mixed Media Elements, changing them to a light gray color when printing. It looks like deer tracks in the snow!
I have a previous blog post that explains how to arrange images for scenes in greater detail.
Click here to see that post.
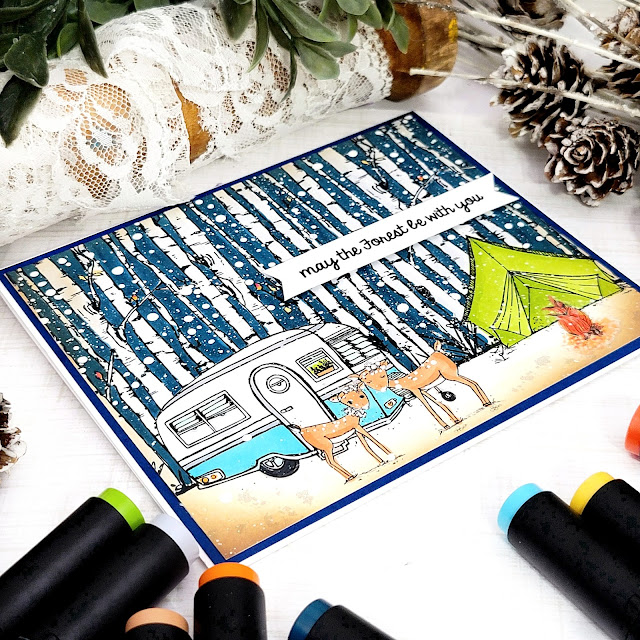
Let me also talk about coloring the trees and sky. First, I colored the trees using a grey color, C-G 1. After coloring all the trees, I then went in and colored the sky in between, using a dark blue marker,
BG 0.8. Because I wanted the sky even darker, I added another layer of the same color to deepen it.
There are no rules, the "sky's the limit", no pun intended, haha.
I finished off my card panel with some paint splatters and a touch of ink blending around the edges with Ranger Ink Distress Oxide ink in Vintage Photo.
If you'd like to give OLO markers a try, just click my affiliate link here. There are no added costs for you to use my link and I appreciate it so much when you do.
Thanks for stopping by!
Terri
#wavingmywand #olomarkers #artistmarkers #angieblomdigitaldesigns #winter #snow #nightsky #cardmaking #coloring #cards #camping #digitalstamps
 :)
:)
 :(
:(
 :))
:))
 :((
:((
 =))
=))
 =D>
=D>
 :D
:D
 :P
:P
 :-O
:-O
 :-?
:-?
 :-SS
:-SS
 :-f
:-f
 d(
d(
 :-*
:-*
 b-(
b-(
 h-(
h-(
 g-)
g-)
 5-p
5-p
 y-)
y-)
 c-)
c-)
 s-)
s-)
 d-)
d-)
 w-)
w-)
 :-h
:-h
 :X
:X
No comments:
Post a Comment
(Ignore the robot caption feature and just click submit for your comments. It's a blogger glitch) I appreciate each and every comment. Thank you so much!