Friday, February 27, 2015

Coffee Loving Papercrafter's Spring Blog Hop

It's time for another Coffee Lover's card.  I'm joining the lovely ladies over at coffeelovingcardmakers.com for their Spring Blog Hop.


I'll be using the Sizzix Mug die by Eileen Hull and cardstock from the Bo Bunny Rose Cafe Collection for this card.  


                 Sizzix Mug Die                                                   Bo Bunny Rose Cafe


I started by cutting 2 die images with my Cuttlebug, one with white cardstock and one with Bo Bunny.  Next, I inked up the top of the white die cut, and cut the "lid" tops off both.

I took my fine point Fiskars scissors, and cut a scooped edge at the top of my Bo Bunny die cut.  Next, I glued the top of the inked lid, to the backside of my mug and cut straight across, and glued the other trimmed decorative lid to the backside of that, so it looks like the backside of the coffee mug.  Basically, I eyeballed and trimmed everything to my liking, until I got what I thought looked like a mug of coffee, with coffee inside!


I love how my handmade mug and card turned out!  


Additional supplies:
Vellum
blue gemstone
Ranger blending tool

Disclosure: This post may contain affiliate links so, if you purchase a product using the link I may receive a commission. I only participate in the affiliate programs linked above because they are products that I use and love. Your purchase price is not affected in any way, by using my links.  Thank you for your support and helping me keep my content free!

Thursday, February 26, 2015

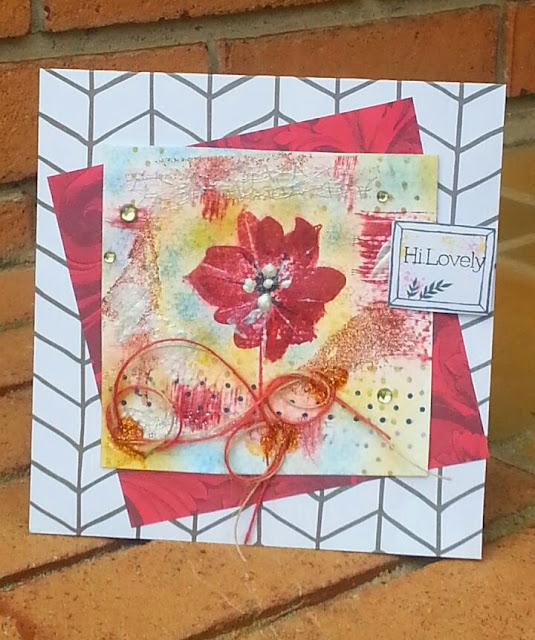
Mixed Media Watercolor Flower

Recently, I've delved more into the mixed media side of cardmaking.  I just received some happy mail from Simon Says stamp, so it's the perfect opportunity to do more delving.

I started out by inking up my flower and adding texture to the surrounding area as well as the flower itself.  I used several different inks on this card from Simon Says Stamp, Goldenlocks, Lavender, Schoolhouse Red and Soft Navy. For the red, I literally scraped it across my watercolor paper in places and used my blending tool for the other colors.  This is my first time using SSS ink and I must say, the color is so rich and deep.  I'm a fan already!


I also incorporated some other mediums, glittered mesh, burlap string, glitter paste and Pearlescent, applied with a metal paint scraper.   The cardstock is from the We R Memory Keepers Shine pad and was trimmed/scored to 5.75".  The little die piece is also WRMK and is from the Inked Rose pad.  I stamped the SSS sentiment, "Hi Lovely", onto it and popped it out with foam squares.


Most of these items can be found at Simon Says Stamp.  Click my banner below to go shopping.  Using my affiliate links helps keep my content free and allows me to have fun giveaways.  Thanks for your support!
Exclusive set from Simon Says Stamp, "Hi Lovely" stamps and coordinating dies


Additional supplies: Queen & Company light green bubbles, Ranger Tim Holtz Brushed Corduroy distress ink, Bo Bunny Pearlescent, Tulip Copper Glitter Fabric glue, Bo Bunny glitter copper paste, mesh from Scrapbook Expo, Red and natural burlap string from May Arts Ribbon, Tombow Xtreme adhesive runner, foam dots, Ranger blending tool, We R Memory Keepers trimmer/score board, red floral light cardstock (maker unknown)

Disclosure: This post may contain affiliate links so, if you purchase a product using the link I may receive a commission. I only participate in the affiliate programs linked above because they are products that I use and love. Your purchase price is not affected in any way, by using my links.  Thank you for your support and helping me keep my content free!

#WRMK #Tombow #mayartsribbon #cre8time #simonsaysstamp #bobunny


Tuesday, February 24, 2015

Easter Bunny Gift Box

Today, I'm sharing this cutie that I made with svg files from SVG Attic.  The kit is called Hop To It and comes with cutting files for the carrot treat box, the bunny treat box and the adorable basket, pictured below.  Even my 13 year old son wanted to help put this fun bunny together.  I used my Cricut Explore to cut the files and Tombow Xtreme Adhesive and Mono Aqua Glue from Simon Says Stamp, to put it all together.  If you've been thinking about getting a Cricut Explore....run, don't walk!  Best crafting decision I ever made. 

Easter comes early this year, so hop to it and get crafty!


Free shipping on all orders over $35 with code FREESHIPFEB at Cricut.com


Disclosure: This post may contain affiliate links so, if you purchase a product using the link I may receive a commission. I only participate in the affiliate programs linked above because they are products that I use and love. Your purchase price is not affected in any way, by using my links.  Thank you for your support and helping me keep my content free!

#cre8time #cricut #cricutexplore #svg #easter #bunny #freeship #couponcode

Monday, February 23, 2015

He Is Risen Easter card

Today, I'm sharing a set of Easter cards that I made for a customer.  This card is a combination of stamping, in addition to font writing with my Cricut Explore.

One of the best features of the Cricut Explore, is the ability to add text in numerous choices of fonts.   Not only does Cricut have a great selection of fonts, but I can download free fonts from numerous sites and pull them up as system fonts, in the Cricut Design Space.   I'm an avid stamper but sometimes, I have the need for a specific quote or phrase that is not in my stamp collection.


Another fabulous thing that I love about my Cricut Explore, is the dual accessory mount.  There's one mount for the blade and and a mount for the pen.  But guess what?  I didn't use a Cricut pen for this design.  You will quickly find out that other pens work as well.  Believe it or not, this is a Crayola slim line marker.  Yes, I raided my son's old stash of Crayola markers to find some that fit my Explore.

The Design Space online is only for the Cricut Explore and they've just come out with a new app for the IPAD so you can design with even greater convenience.  How cool is that?  Unfortunately, I don't have an IPAD but they are working on an app for Android as well.  One of the features that is still to come is the shadow feature.  I decided to outline the font below by hand, for added dimension, but I'm looking forward to the shadow feature so I won't have to outline by hand.  Of course, some fonts have that feature already built in, but the free font that I used below, did not.


Lastly, let me mention the stamp used today.  The cross is from the Unity Stamp Company, and is called "Saved".  I used distress ink and Tombow dual brush markers to color the vine.  I also shaded the paper with chalk ink.

If you're interested in purchasing the Cricut Explore, click on this banner.


Additional Supplies: Quick Quotes Powder Puff chalk ink, Tim Holtz distress ink Brushed Corduroy, Tombow dual brush markers Bright collection, Bo Bunny Rose Café cardstock, The Paper Studio dark collection core cardstock (purple), Tombow Xtreme adhesive runner


Disclosure: This post may contain affiliate links so, if you purchase a product using the link I may receive a commission. I only participate in the affiliate programs linked above because they are products that I use and love. Your purchase price is not affected in any way, by using my links.  Thank you for your support and helping me keep my content free!


#cre8time #easter #heisrisen #unitystamps #chalk #quickquotes #cricutexplore #cricut #font


Saturday, February 21, 2015

Birthday card set

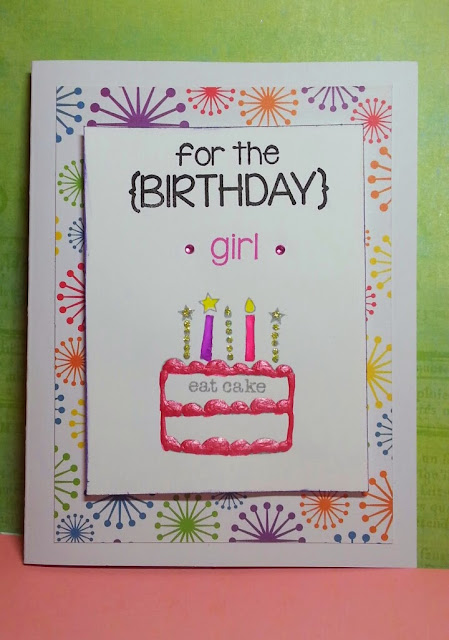
I've worked up a fun set of birthday cards by customer request.  She wanted some cards for her small granddaughters and some all purpose birthday cards for adults.  I decided to incorporate all the same fun papers, yet putting a different spin on each.

I'm all about scrapping with what I have these days, so I used some background paper that I've had awhile.  You know when you've had it so long, that the cover somehow becomes separated?  Haha.  So I'm not sure the maker of the festive, fireworks-like design, but the smaller striped and polka dot elements are We R Memory Keepers Inked Rose pad, one of my favorites.


On some of the cards, I went ahead and edged with Quick Quotes Powder Puff chalk ink.  The sentiments were inked with Colorbox Pigment ink.  All of the stamped images are from the Unity Stamp Company.  The yellow bakers twine is from May Arts Ribbon.


Here, I've used some Stickles glitter glue on the lollipop.


This card also has glitter glue and DecoArt Paper Effects in Pink for the "frosting" on the cake.  The candles were colored with Tombow Dual Brush pens.

The panels are popped up with pop dots on the last two cards.

Get busy, and make use of your stash!

Additional supplies: Unity Stamp Co Birthday Jubilee sentiment kit, Sucks to get old and Cake Wishes kit stamp sets, gemstones, Tombow Xtreme adhesive runner, Ranger Black Adirondack ink, Quick Quotes yellow and purple chalk ink, Memento London Fog ink, Stickles Crystal and yellow glitter glue, Tombow Bright dual brush pens

#cre8time #mayartsribbon #unitystamps #quickquotes #decoart #tombow #glitter

Disclosure: This post may contain affiliate links so, if you purchase a product using the link I may receive a commission. I only participate in the affiliate programs linked above because they are products that I use and love. Your purchase price is not affected in any way, by using my links.  Thank you for your support and helping me keep my content free!

Friday, February 13, 2015

Artsy business cards 20% off now through 2/17/15 at tinyprints with code

Save 20% off now on these artsy business cards at tinyprints.com with code BIZ20FEB, good through 2/17/15.  The perfect business card for the artist/crafter.  Add your social media contact information and be ready at your next event.  Add this stylish business card to your packaged orders and impress your customers.


#tinyprints #tinyprints.com #art #craft #businesscards

 Disclosure: This post may contain affiliate links so, if you purchase a product using the link I may receive a commission. I only participate in the affiliate programs linked above because they are products that I use and love. Your purchase price is not affected in any way, by using my links.  Thank you for your support and helping me keep my content free!

Thursday, February 12, 2015

Card Making with Stamps and Why It's Hot

I'll be the first to tell you.   I never, ever thought I would become a stamper.  Back in the day, I would attend crops and I still do.  You know, those fun crafty gatherings where you sit all day scrapbooking, crafting, sewing.....and get saddle sore?  Unless, of course, you're a seasoned crafter; they bring their own comfy chairs!  I'd seen different ladies stamping over the years but, I didn't understand it, nor did I understand it's appeal.  I decided to give this technique a whirl, after a scrapper friend taught me heat embossing.   I was hooked. 

What's the appeal, you say?  Well, let me quickly share a few key points:

1.  You can say goodbye to "Wal-Mark".  A few, very inexpensive items are all you need to start creating your own handmade, thoughtful and inexpensive cards. 
  • A stamp
  • An ink pad
  • Plain card or cardstock
Those three things are all you need to get started.   I used all three of those items on the card below, plus three accessories; glitter glue, sequins and an acrylic block.  The acrylic block is the mount for my stamp.  You can find a small one for around $1.00 in a craft supply store.  I intentionally used very few items on this card, just to show you how easy and inexpensive it can be.  Sure, you can invest in more accessories and go all out, but the point is....you don't have to.  Anyone can make a card.  It's a matter of having the right tools, the desire and proper instruction.

2.  Your creative options, with one stamp set alone, are endless.  Look around and you can find a few basic all occasion stamp sets that will cover just about any holiday or special event.  Your creativity is only limited by your imagination.  You can find inspiration everywhere these days, whether it be social media such as Pinterest or a magazine.  The set I'm using today, has butterflies and hearts.  That pretty much covers everything from a wedding to a birthday to Valentine's or just because. 

3.  Make some extra cash.  Be the go-to girl or guy for your friends and family.  Make some cards for any occasion and have them on hand.  Word of mouth can be a powerful thing.

4.  Are you a giver?  Donate!  This is the perfect opportunity for you to make something that's a little piece of you, and donate it for a good cause.  How about taking cards to the local nursing home so the residents can give one to a family member?  Make a set of cards and box them up pretty for a school auction.  I'm actually kicking off a fundraiser event making and selling Valentine cards for my son's upcoming mission trip with the youth group at church.  Do you have a favorite server in a restaurant?  A barista at the coffee shop?  Wouldn't it just make their day the next time you stop in and hand them a sweet card? 
 

Now you know the appeal.  And as an added bonus, let me share a tip on the card I made above.  Generational stamping.  That's when you stamp your inked image more than once without re-inking.  I spaced out and stamped a darker image with the butterflies, then stamped again quickly to give the same image a faded look.  There's your bonus tip of the day.

If you're interested in the set below, I would appreciate it if you would use my affiliate link to shop.   And if you enjoyed my article today, please leave a comment.  Thanks so much! 

Here's the link:


Supplies: Colorbox Pinkolicious archival ink, Waffle Flower "Flutter" stamp set, Ranger Stickles glitter glue in Crystal, Pretty Pink Posh sequins, The Paper Studio 4.5"x5.5" white card

Disclosure: This post may contain affiliate links so, if you purchase a product using the link I may receive a commission. I only participate in the affiliate programs linked above because they are products that I use and love. Your purchase price is not affected in any way, by using my links.  Thank you for your support and helping me keep my content free!

#cre8time #waffleflowercrafts #stamping #glitter #sequins #colorbox #ranger

Wednesday, February 11, 2015

Waffle Flower Valentine Heart

 I've been working on Valentine cards, to sell locally, to kick off fundraising for my son's upcoming mission trip in a few months.  He's 13 and this will be his first mission trip with the youth group at church, and the first trip away from home without Mom and Dad!

I'll be featuring this lovely stamp set from Waffle Flower Crafts over the next few days, called "Flutter".  You can purchase this set here, using my affiliate link:


Supplies:

Ranger Ink - Stickles Glitter Glue - Crystal - $1.99
from: Scrapbook.com
Pretty Pink Posh sequins

Queen and Company - Trendy Tape - Skinny Mini - Pink Stripe - $2.99
from: Scrapbook.com


ColorBox - Stephanie Barnard - Premium Dye Inkpad - Guava


Disclosure: This post may contain affiliate links so, if you purchase a product using the link I may receive a commission. I only participate in the affiliate programs linked above because they are products that I use and love. Your purchase price is not affected in any way, by using my links.  Thank you for your support and helping me keep my content free!


#cre8time, #waffleflowercrafts #valentine #heart #colorbox #mayartsribbon

Tuesday, February 10, 2015

Make Easy Valentine Hearts with Washi Tape

 I'm working on a fundraiser, as my son is going on his first mission trip in a few months, so I decided to make some quick and easy Valentine cards to sell, with proceeds going to the Youth Group Mission Fund.

I snagged this fun washi tape at the dollar tree and alternated strips onto 8.5"x11" white cardstock.  I cut heart shapes onto my washi cardstock with my Cricut Explore, but you can easily use a 3" heart punch as well.


Next, I ran my hearts through my 9" Xyron Creative Station and made my hearts into stickers.  If you don't have a sticker maker, just grab an adhesive runner from your local craft store.   Some Walgreens and CVS stores sell these as well.
 

Add some ribbon or gemstones, a sweet sentiment, and you are done!


Supplies:
Unity Stamp Co Sentiment from "Everything Love" kit  


Xyron - Xyron 900 Creative Station Sticker Maker - Home
from: Scrapbook.com
Prima - Allstar Collection - Sugar Enamel Dots
from: Scrapbook.com
Doodlebug Design - Sweetheart Collection - Washi Tape - Endless Love
from: Scrapbook.com

Cricut Explore Machine Vinyl Starter Set

from: Cricut


Disclosure: This post may contain affiliate links so, if you purchase a product using the link I may receive a commission. I only participate in the affiliate programs linked above because they are products that I use and love. Your purchase price is not affected in any way, by using my links.  Thank you for your support and helping me keep my content free!


#cre8time #valentinesday #heart #love #washi #cricut #cricutexplore #xyron #mayartsribbon #unitystamps #thermoweb

Sunday, February 8, 2015

Fancy Pants Design and MPC challenge

Hey everyone!  Come on over to Mountain Plains Crafters, where we're having a fun link up challenge, sponsored by Fancy Pants Design!  


As you guessed, the theme is nautical and the prize is from the FPD Nautical collection.  Join in by creating a new project and linking to the Inlinkz link over at Mountain Plains Crafters.  You've got all week to come up with something and I know you can!  Ends 2/13/15 at 6 pm ET, winner announced Monday, 2/16/15.

While you're at it, come and like my Facebook page, https://www.facebook.com/wavingmywand and 
the community page for Mountain Plains Crafters!  There's always something fun going on so check in daily for cool links, giveaways, and more.


You can also find me on: http://instagram.com/wavingmywand

Supplies:

 Gold foil alphabet stickers and gemstones from Stickabilities
 Red striped ribbon

#cre8time #fpd #fancypantsdesigns #wavingmywand #wrmk #wermemorykeepers #tombow

Disclosure: This post may contain affiliate links so, if you purchase a product using the link I may receive a commission. I only participate in the affiliate programs linked above because they are products that I use and love. Your purchase price is not affected in any way, by using my links.  Thank you for your support and helping me keep my content free!

Thursday, February 5, 2015

Additional 20% off Ranger products, including clearance!


I'm super pumped!  Some of my absolute favorite Ranger products are on sale right now at Scrapbook.com.  Right now, get an additional 20% off, including clearance.  Your discount will show up at checkout.  My absolute favorite color is Brushed Corduroy.  I use it all the time.  And at these prices?  Yup.  I'm stocking up.  Oh, and did I mention....they accept Paypal?  Bonus!


Scrapbook.com: Thousands of scrapbooking supplies. HUGE daily discounts!


I also love that you don't get gouged on shipping, which on a $10+ order will run around $3.99.  So check out the goodies while they're available.  (I'm also loving the Little B thin red antique striped washi tape!)  Please use my links....it helps keep my content free and allows me to give good prizes from time to time.  Thanks so much.  Share this with your friends!


Disclosure: This post may contain affiliate links so, if you purchase a product using the link I may receive a commission. I only participate in the affiliate programs linked above because they are products that I use and love. Your purchase price is not affected in any way, by using my links.  Thank you for your support and helping me keep my content free!
#ranger #timholtz #clearance


Tuesday, February 3, 2015

Upcycled Shoe Box Storage

Need to organize your craft space?  How about utilizing something you probably already have on hand; shoe boxes.  We all have them, sitting around, taking up space in our closets, right?  For this fun, crafty upcycle, all you need are a few supplies:

Scissors
Scrapbook Paper
Stapler
Colored Staples
Ruler


 1.  Measure and trim your paper to size.
2. Add 3 well placed staples on the sides and 2 on the end corners. 

That's it!  It doesn't get any easier than that.

Pick a theme and colors, and perk up your crafty space.  I plan to make some more and stick with the pink/blue/yellow theme.  Mix and match patterned boxes with solid colored boxes for some added pop.    Versatile and pretty! 


                                            from: Scrapbook.com


Disclosure: This post may contain affiliate links so, if you purchase a product using the link I may receive a commission. I only participate in the affiliate programs linked above because they are products that I use and love. Your purchase price is not affected in any way, by using my links.  Thank you for your support and helping me keep my content free!
#upcycle #recycle #cre8time

Monday, February 2, 2015

Growing in Unity Winners from Waving My Wand


Thanks again to everyone who was so supportive and left comments on my blog every day last week.I had so much fun creating with Unity Stamps and showcasing some fun projects, and testing out some new techniques as well.  I took all 207 comments, minus duplicates and comments from myself, entered them in random.org, counted all the qualified entries, and ended up with the winners you see below.


From Day 2:

Sue D said...
What a sweet card to showcase this sentiment.

From Day 4:

Brittany M. said...
Great job on a masculine card that combines to interests! I really love all the details.


Sue and Brittany will each receive a grab bag of 25 random stamps from the Unity Stamp Company. Ladies, please email me your mailing address so I can forward it to Unity Stamps.  To avoid spammers,I'm posting my email as momtojeb (at) gmail (dot) com.  Please fill in the appropriate symbols when emailing me.


Disclosure: This post may contain affiliate links so, if you purchase a product using the link I may receive a commission. I only participate in scrapbook.com’s affiliate program because they are products that I use and love.  Your purchase price is not affected in any way.  Thank you for your support! 

#giveaway #winner #wavingmywand