Showing posts with label Clearsnap. Show all posts

Tuesday, November 20, 2018

Thankful For You Card for Paper House Productions

I'm so happy to share this seasonal card, right here at my favorite time of the year!  This card features products from Paper House Productions, including the new Life Organized Seasonal Sticker pack.  Ya'll, there are 30 sheets of stickers....1200 different images!  You can make the cutest cards!  I love that they're so versatile for cardmaking, planners and scrapbooking!  This collection has you covered with all your holidays and seasons.  You need this in your life!


(FTC Disclosure: as an affiliate for various companies in the craft industry, I will receive a small commission for purchases made through my convenient affiliate links.  This does not affect your purchase price.)


I also did some ink blending on my Neenah Solar White cardstock using my Colorbox paint box inks.  Such a simple card with beautiful impact.   Add this sticker book to your collection today!


#paperhouseproductions #wavingmywand #lifeorganized #seasonal #stickers #thankful #thanksgiving #fox #sceniccards #autumn #clearsnap #colorboxink #paintbox #scrapbookadhesivesby3L #DIY #papercrafts #cardmaking #handmadecards 

Thursday, September 27, 2018

Photo Display Card for Paper House Productions

Here is a project that is near and dear to my heart.  It's my sweet, 16 year old teen chef!  I wanted to make a photo card that I could display on my desk at work.  He's an aspiring culinary chef and is in his 2nd year of culinary classes.  He'll finish his 3rd year, next year when he's a High School Senior.  I could go on and on about this kid, but first, let me tell you about the amazing Delish paper collection from Paper House Productions.  I love it so much!  I've paired several papers, stickers and journal pieces for this card.   Plus, we're showcasing Clearsnap Colorbox ink this month and I've made some "rusty" elements that I'll tell you about further down.  Stick around, I've got a coupon code for you too!


First, I opened up the brand new Colorbox Rose Gold pigment ink and breathed in that glorious new ink smell!  This color is so dreamy and was perfect for what I had in mind - creating rust in my cast iron sticker!  It worked like a charm too.   For the cast iron pan sticker (included with the paper kit) I simply took a Q-tip and dabbed my pigment ink, then swiped my pan sticker along the inside lower portion.  Add some clear embossing powder to heat set and you've got rust!

If you'll notice those little round knobs to the left, I also "rusted" those as well.  They are small black adhesive foam dots from Scrapbook Adhesives by 3L.  Instead of swabbing though, I took my ink pad and just brushed across the surface and heat set with clear embossing powder, again, using my craft heat tool.  I love the rustic look!


This collection is perfect for scrapbooking, chronicling your food journeys in your travelers notebooks, pairing with your travel destination photos and for making photo cards too!  I fussy cut this photo that was taken last year when my teen attended a culinary competition.  Speaking of fussy cutting, those bunches of thyme leaves?  Yup.  Lots of detailed cutting.  I wanted them to look as realistic as possible.  I think it was worth it, don't you?


I hope I've inspired you to break out your scissors and make lots of photo cards.  If you're on Instagram, be sure you're following me @wavingmywand.  I recently shared a quick video on how I made that rusty skillet and occasionally share my teen's culinary journey as well.  In fact, he just started his first job and is so excited to be prepping food and cooking in a real restaurant!  Can you tell we're just a little bit proud of him?  

And, because I can, shout out to the best culinary instructor in the South; Chef Kasie Hairrell from the Calhoun County Career Academy!  Woot!

Thanks so much for popping in today.   If you'd like to shop for this collection, please use any of my convenient affiliate links scattered throughout this post.   For a limited time, shop this link to receive 10% off your order when shopping directly through Paper House Productions:  Use coupon code PHP2018 at checkout for the discount. 


See you next time...  Terri


#paperhouseproductions #wavingmywand #clearsnap #colorbox #pigmentink #scrapbookadhesivesby3L #scrapbookcom #delish #scrapbook #paper #stickers #embossing #heroarts #castironskillet #rust #terriburson #papercrafts #DIY #cards #cardmaking #adhesive #runner #handmade #handmadecards #rosegold #photocards #culinary #teenchef #gourmet #foodie #raisingafuturemasterchef #neenah #foamdots #thyme #chef #cook #southerncook #herbs #travelersnotebooks #journaling #documentlife 


Wednesday, September 19, 2018

Christmas Eve Rush Hour

Hello crafters!  This month, the Paper House Production design team is showcasing Colorbox Inks from Clearsnap, and using an Anything Goes theme.   It's also Washi Wednesday and yup, there's some washi tape somewhere on this card.  Can you find it?  
Obviously, I went with a Christmas theme.  It's Christmas Eve and Santa's Elves are working overtime, as usual.  

For my scene, I created "toys" ready to be stuffed in Santa's sack, using 3D stickers and faux enamel stickers.  I'll be sharing affiliate shopping links throughout this post, if you see something that you need!  If you have a minute, scroll down and I'll explain some of the details on this card.


(FTC Disclosure: as an affiliate for various companies in the craft industry, I will receive a small commission for purchases made through my convenient affiliate links.  This does not affect your purchase price.)


First, let me tell you about my elves.  I'm using stamps from Studiol2e which were inked with Colorbox Wicked Black Dye Ink.  I LOVE this ink!  It's my new favorite.  It's perfect for watercoloring, which I love to do, yet also works great for alcohol markers.  And...... there's the washi tape, on the gift this little guy is holding!  


Clearsnap Colorbox WICKED BLACK Archival Dye Ink Pad 270240 - $4.49
When permanence and archival quality is important, archival dye ink is the crafter's choice. Gorgeous on-trend colors that are ideal for scrapbooking and journaling projects. Fast-drying, permanent and perfect for watercoloring. Dry ink will not smear when moistened.


I also used a water brush to color my elves using the Colorbox Pigment Paintbox Inks.  These colors are gorgeous and so easy to watercolor with.  I had fun mixing colors too.  I made my little girl elf a paper pieced skirt from the Colorwashed paper collection.


Many of my elements, including the faux enamel stickers, are popped up on foam squares from Scrapbook Adhesives by 3L.  For my 3D stickers, I needed to downsize them a bit and take off the extra foam layer.  My dinosaur was chopped up, to fit inside Santa's sack.  Don't be afraid to cut up your stickers!  Sometimes you need to, to make a project work.  And, that's ok.


For my signage, I created a scored board with "nails", using papers and stickers from the Delish paper kit.  Other papers include the Lake Life collection, including Santa's sack that I made by hand.  


Thanks so much for popping in today.  I hope I've inspired you with some creative ways to use your Paper House products.  Thanks so much to Clearsnap for sending these amazing inks to the team!  See you next week with another PHP and Clearsnap project!  Terri


#paperhouseproductions #wavingmywand #clearsnap #colorbox #ink #washitape #delish #lakelife #fauxenamelstickers #3Dstickers #scrapbookadhesivesby3L #studiol2e #simonsaysstamp #cards #cardmaking #santasworkshop #northpole #elves #terriburson #stamps #coloring #watercolor #DIY #cardmaking #papercrafts #scrapbooking


Tuesday, September 27, 2016

Graphic 45 Cafe Parisian for Coffee Loving Cardmakers


FTC disclosure: This post may contain affiliate links so, if you purchase a product using the link I may receive a small commission. I only participate in affiliate programs that feature products that I use and love. Your purchase price is not affected in any way, by using my links)

Hello crafters.  I'm so excited to share this project with you today.  Graphic 45 has come out with a new collection called "Café Parisian".  It is absolutely dreamy.  It's all things French, pastries, coffee, tea..... a European Culinary delight!


When I saw the first sneak peeks on the G45 website, I knew that I would have to share with my coffee and tea loving friends.  The Graphic 45 family is near and dear to my heart.  I first came to know them through the Craft and Hobby Association trade shows and had the pleasure of sitting in on one of their classes for my article on the CHA blog.  If you ever have the opportunity to see Jeff Filimoehala teach a class, you are in for a treat.


from: Scrapbook.com


I love that so many of the G45 papers blend with other collections and allows you to make the most of what you have.  I adore plaids and stripes and this collection is full of them.


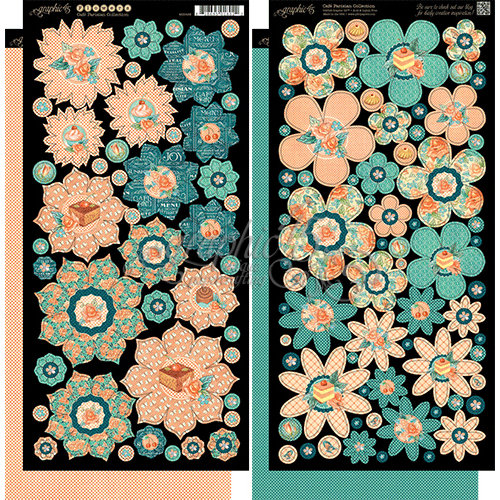
On my card today, I'm using several Café Parisian products; ephemera, paper, die cut flowers and my favorite at the end of this post.... the #3 stamp set.  There are 3 stamp sets in this collection and they are all amazing, but #3 is my favorite.  Isn't that tea cup just darling?  Imagine all the different ways you can color and embellish it.  I've watercolored my tea cup today, using Susan K Weckesser Color Pop mini inks.


from: Scrapbook.com


Graphic 45 was kind enough to send me their collection so I could share with all my friends at the Fall Coffee Loving Cardmakers Blog Hop.  They are also sponsoring a prize featuring some of these very products.


It would be lovely if you would stop by the G45 Facebook page or their Instagram page, and leave them a comment, thanking them for this giveaway.  Just mention that the Coffee Loving Cardmakers sent you.  Thanks so much for stopping by today.  I'm leaving you with the shopping link below.  It's wonderful isn't it?  That tea cup.... the sentiments.... you're very welcome!


from: Scrapbook.com


Shop Your Fav Brands at Scrapbook.com


#graphic45 #g45 #cafeparisian #Fall2016clh #coffee #coffeelovingcardmakers #coffeelovers #tea #tealovers #French #Parisian #wavingmywand #terriburson #eiy #card #craft #scrapbook #cre8time #susankweckesserink #clearsnap #colorbox


Monday, March 9, 2015

Vintage Guy Birthday card

As many card markers do, I have lots of scraps, in all shapes and sizes.  We crafters are a thrifty lot and we save EVERYTHING!   I decided to dive into the archives to make this manly card for a customer.  I've used bits of Teresa Collins Vintage Finds papers along with some other scrap pieces.  The stamping, inside and out, is from the Unity Stamp Co Birthday Jubilee kit and the ink I chose for today is Colorbox in Saddle.  It was the perfect shade to match the vintage background.
To embellish, I added some May Arts Ribbon natural burlap string and Studio Calico Woodgrain enamel dots, along with the burlap bird sticker from Little Yellow Bicycle.  And, that's a wrap!


Additional supplies: Pop Dots, Tombow Xtreme adhesive runner, We R Memory Keepers yellow striped cardstock from the SHINE 12x12 stack.


Disclosure: This post may contain affiliate links so, if you purchase a product using the link I may receive a commission. I only participate in the affiliate programs linked above because they are products that I use and love. Your purchase price is not affected in any way, by using my links.  Thank you for your support and helping me keep my content free!

Wednesday, February 11, 2015

Waffle Flower Valentine Heart

 I've been working on Valentine cards, to sell locally, to kick off fundraising for my son's upcoming mission trip in a few months.  He's 13 and this will be his first mission trip with the youth group at church, and the first trip away from home without Mom and Dad!

I'll be featuring this lovely stamp set from Waffle Flower Crafts over the next few days, called "Flutter".  You can purchase this set here, using my affiliate link:


Supplies:

Ranger Ink - Stickles Glitter Glue - Crystal - $1.99
from: Scrapbook.com
Pretty Pink Posh sequins

Queen and Company - Trendy Tape - Skinny Mini - Pink Stripe - $2.99
from: Scrapbook.com


ColorBox - Stephanie Barnard - Premium Dye Inkpad - Guava


Disclosure: This post may contain affiliate links so, if you purchase a product using the link I may receive a commission. I only participate in the affiliate programs linked above because they are products that I use and love. Your purchase price is not affected in any way, by using my links.  Thank you for your support and helping me keep my content free!


#cre8time, #waffleflowercrafts #valentine #heart #colorbox #mayartsribbon

Thursday, January 29, 2015

Growing in Unity - Day 4

Welcome to day 4 of my stint as the GIU (Growing in Unity) girl.  I'm showing you my creations all week long and if you comment every day on my blog post, you'll be entered into a random drawing for 25 random stamps from the Unity Stamp Company.  Wowza, 25 stamps!  
Who wouldn't love that?!  2 winners will be selected.


I made this for a gentleman who sings in our church choir, and is just retiring from his job after 30 years.  He's an avid hunter/fisherman, so I used a piece of WRMK designer paper that has this stag on it.  The stamp set I'm using today is called, "Sing a New Song".  It's one of my favorites and I felt it would be the perfect set to use for this card, embracing the recipient's love of music and hunting. 


I used the sentiment and musical notes from the kit, stamping with Colorbox archival ink in Saddle.  I did a little water coloring around the sentiment as well.


For the inside of the card, I used a sentiment from the "Everything More" sentiment kit.  This kit is a staple and has a perfect sentiment for just about any occasion.  I inked up the edges of the musical note paper with the same ink.


Come back tomorrow for more Unity inspiration! Don't forget to leave a comment here so you can qualify for the random drawing.  And for a shameless plug, I'd love if you would come and like me on FB: http://www.facebook.com/wavingmywand because when I get to 500 likes, I'm having a big giveaway!


Sticky Doo pop dots

Disclosure: This post may contain affiliate links so, if you purchase a product using the link I may receive a commission. I only participate in the affiliate programs linked above because they are products that I use and love. Your purchase price is not affected in any way, by using my links.  Thank you for your support and helping me keep my content free!

Tuesday, January 27, 2015

Growing in Unity - Day 2

Welcome to day 2 of my stint as the GIU (Growing in Unity) girl.  I'm showing you my creations all week long and if you comment every day on my blog post, you'll be entered into a random drawing for 25 random stamps from the Unity Stamp Company.  Wowza, 25 stamps!  
Who wouldn't love that?!  2 winners will be selected.

This sweet card was built around one of my favorite Unity Sentiments by the lovely artist, Phyllis Harris.  The set is called "Before I Met You Tiny Dancer".   I actually received it in a grab bag....so see?  Those random stamps are pretty cool.   You'll see several projects from me this week with Love as the theme.  This card could be used romantically for Valentine's Day, a romantic celebration, or even a baby shower.


I wanted to build a beautiful backdrop and have you zero in on the sentiment, so I started by cutting a lace heart, just under 6" with my Cricut Explore.  If you don't have a die-cutting machine, use a large pink heart shaped doily as a nice substitute.  Next, I cut a smaller heart on white chevron cardstock and used my blending tool to blend in some Colorbox ink around the edges.


The lace heart and sentiment are the shining star to the floral backdrop from Graphic 45.  I embellished the heart with Pretty Pink Posh sequins glued with Stickles Firefly glitter glue and a silk May Arts Ribbon bow finishes everything, with a purple rhinestone.  I left the inside blank as this card could be used for a number of occasions.


Come back tomorrow for more Unity inspiration! Don't forget to leave a comment here so you can qualify for the random drawing.  And for a shameless plug, I'd love if you would come and like me on FB: http://www.facebook.com/wavingmywand because when I get to 500 likes, I'm having a big giveaway!


Additional supplies:
DCWV Quince Blossoms white chevron cardstock

Disclosure: This post may contain affiliate links so, if you purchase a product using the link I may receive a commission. I only participate in the affiliate programs linked above because they are products that I use and love. Your purchase price is not affected in any way, by using my links.  Thank you for your support and helping me keep my content free!
#unitystamps #mayartsribbon #dcwv #cre8time #tombow #prettypinkposh #xyron #phyllisharris #graphic45 #clearsnap

Friday, January 9, 2015

ADORNit feature - Wall hanging with Art Play Paintables

On Monday, the design team at Mountain Plains Crafters participated in a joint blog hop with ADORNit; creator of all things, fabric, paper crafts and the all new Art Play Paintables, designed by artist Lindsay Ostrom.  We created sooooo many lovely things that I'm breaking it down in a more detailed format this week, featuring each of my creations in detail with tutorials. 


To see all the projects from the ADORNit blog hop, go here: 

Next up,  I've used the ADORNit 8"Pointed wood bracket panel to create a sweet wall hanging that would be perfect for a girls room.  I have all boys so I don't often have the chance to create for little girls.


I started by embellishing the flip side of the ADORNit blender paper "Pink Chevron" with a white paint dabber and glitter.  Next, I watercolored my image, which is from the Art Play Paintable "Love You" collection, with Tombow pens in Bright.  I cut an oval image of the quote with the Lil' Inker Design Stitched mat oval frame and my Cuttlebug.  I used the "Burnished Mustard" fabric from ADORNit to create a fringed, knotted hanging.  This panel is very thin so I used some small thumb tacks but be VERY CAREFUL not to go in too far or your nail will come through to the other side.  If this does happen, get a hammer (holding your wood secure) and lightly tap the exposed nail back in.  And yes, this happened to me, haha, but you can't even tell.  Whew!  Disaster averted!


I made some quilled flowers using the ADORNit blender paper, "Green Pixie Dots" and My Favorite Things Die-Namics rolled flower die, and even made some tiny leaves with the same paper.  If you've never quilled before, you will need a quilling tool.  They're under $5.00 and My Favorite Things has tutorial videos for instruction.  There is a bit of a learning curve but once you get the hang of it, it's so much fun!  I credit one of my design team member friends at Mountain Plains Crafters, MariLynn DeGroot, for inspiring me to try a new technique.  She's kind of brilliant.


Did I mention I did a little sanding on the paper?  I love giving the distressed look to something pretty.  Gives it a little edge.


Additional Supplies:  May Arts Ribbon green mesh, Ranger Tim Holtz distress ink dabber Picket Fence, Pretty Pink Posh sequins, Ranger Glossy Accents, Tombow Xtreme Adhesive Runner, large doily from party supply store, DecoArt Glamour Dust, white gel pen, Tombow Mono Aqua Glue, scalloped vellum cut with Cricut.com Expression, Clearsnap Pinkalicious archival ink


#cre8time #adornit #tombow #decoart #mayartsribbon #wavingmywand #CHA


Disclosure: This post may contain affiliate links so, if you purchase a product using the link I may receive a commission. I only participate in Amazon and Cricut's affiliate program because they are products that I use and love. Thank you for your support! 

Sunday, December 28, 2014

Cricut Thank You Card

I confess.  I've been a Cricut user for, oh, about 5 years or longer?  And, I'm just now getting linked up to my computer.  Well, there was that thing about no internet for 3 years and trying to find a provider that reaches where we are and bundling our service, etc., etc.

I've been experimenting for the last week or so and getting familiar with Cricut Craft Room and Design Space.  Perfect timing, as I need a Thank You card pronto, and Cricut had just what I needed.


I cut the "thanks" wording from the Bonus Feature of my Cricut Sampler cartridge that I had linked.  I wanted it to look proportional for a 6" x "6 card, so I went with approximately 5.50" x 4.25".  I used only the wording and will save the circled frame for another project.  The wording was cut on black and tan striped paper.  Patterned paper can really give that extra little "pop", don't you think?

Next, I cut the scalloped heart shape on Vellum cardstock, using the Basic Shapes that were already installed and downloaded from my Expression.


 I always use my Xyron 2.5" sticker maker for intricate wording as it's so much easier 
to apply to my cards. 


You can see in the first photo, that I edged my vellum heart with some ink and a blending tool.  
Top it off with a sweet ribbon, and all done!

So, now that I'm hooked up....FINALLY...expect to see more Cricut projects in the near future.

Additional supplies:  May Arts Ribbon silk/brown, Colorbox Queue ink, Ranger mini blending tool


#Cre8time #mayartsribbon #clearsnap #colorbox #xyron #cricut #provocraft


Disclosure:  If you decide to make a purchase through my affiliate links, Amazon will pay me a commission for it. This doesn’t cost you anything additional. These commissions help to keep the rest of my content free.   Thank you!

Wednesday, November 12, 2014

Blog hop featuring Tombow & Unity Stamps + a giveaway!

We're having a fun blog hop at Mountain Plains Crafters and combining creations made with two great companies, Unity Stamps and Tombow Adhesives.  The theme?  Giving thanks.  For my project, I've made a decorative pillow box for my Thanksgiving table, to be filled with a special treat.


The paper I'm using was hand painted from the DecoArt booth at the #CHA 2014 Paper Arts show. I picked out the orange and gold colors and the artist, Alison Craig, performed a Gelli plate demonstration. Fun! So, with Thanksgiving colors in mind, I thought it would be perfect to use today.
I've decided to go old school and share a printed template that was on the inside of my Graphic 45 paper pad.  G45 has graciously allowed me to share this template with you.  I cut it out and used it to model more templates.  You are welcome to enlarge and print it out.   I'll share the dimensions at the end of this post.   :)


The products I'm using today are the Unity background stamp, "Grainy background", and the leaf and sentiment are from a set called "{leafing} Grateful".  I have been an avid fan of Unity Stamps for years and have more than I care to count!  They are the absolute best quality and give me a clear, crisp image every single time. 


I'm also using the Tombow Mono Aqua liquid glue.  It has a fine tip on top and a wide tip on the bottom.  It's my go-to glue!  Love it.  Also, I'm using the Xtreme adhesive runner.  This bad boy sticks to just about anything; wood, metal, fabric....you name it.  Once it sticks, it's stuck for good!


I've penciled and drawn arrows where
I want to score my cardstock template.
                                                        and hand drawn the score.  No fancy score
                                                                           board needed!
                                                         Here, I've stamped my image and used my
                                                        mini blending tool to blend in more color.


I've glued my leaves and sentiment to the grainy frame and folded my frame so it's half on the front and half on the back, glued with the Xtreme runner.  Just a drop of the Aqua mono glue, to make sure my jute twine and enamel dot stay secure.


Thanks for stopping by.  Have a wonderful Thanksgiving!


This link will take you back to the hop or head on over to Sheryl's link.  And don't forget to enter the Rafflecopter giveaway on the MPC link!


**Template dimensions, approximately 5" x 7 1/4" (side folding flap is 1/2")


#giveaway #unitystamps #tombowusa #CHA #Cre8time


Additional supplies: We R Memory Keepers large enamel dot, Websters Pages crocheted ribbon, May Arts Ribbon natural jute twine, Colorbox archival ink in Saddle, Spellbinders Celebra'tions Odacious Orange ink