Showing posts with label prima. Show all posts

Wednesday, June 8, 2016

Hittin' the Beach with DCWV and TCW Stencils

(FTC disclosure: This post may contain affiliate links so, if you purchase a product using the link I may receive a small commission. I only participate in affiliate programs that feature products that I use and love. Your purchase price is not affected in any way, by using my links)
I am so behind on scrapbooking that my child is actually disappointed!  Well, we can't have that, can we?  I recently decided I would try the 8.5"x.11" format.   I always seem to end up staring at those big 12x12 papers with glazed eyes.  A smaller format, in my mind, seems like a step in the right direction; less space to fill and a more intimate format.  At least, that's what I keep telling myself.

So, when I had the opportunity to attend a 3 day craft retreat, I thought it would be the perfect time to give this format a try.  I love how quickly this layout came together.  Once I settled on my papers, everything seemed to just fall into place.  I'm using 3 different paper collections, all from DCWV; Hey Sailor, Bella Armoire and Vintage Collector. 
(Judging by the photos, my son was obviously into "Karate Kid" at the time......!)


For my background, I chose a white/gold beachy page from Hey Sailor that has sand dollars and sea shells.  By the way, you can grab this at Jo-Ann's Stores.  It's one of my favorite paper collections with a beach and nautical theme.

For the fun little cut-outs, I turned to the Vintage Collector papers and fussy cut the bottle cap and happy heart, as well as the Alpha letters to spell BEACH.  My journaling focus was cut from the Bella Armoire 8x8 stack.


I wanted to use one of my stencils from The Crafter's Workshop called Tropical Elements, since I was going with a beachy theme.  I snagged this from Scrapbook.com.
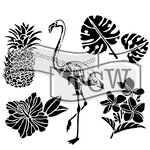
from: Scrapbook.com

I sponged on some of my Colorbox Chalk Ink in 2 different shades, one on top of the other.


Some added extras, such as Prima Flowers, gold mesh, burlap, eyelash ribbon and DoubleClick Skittles bubble embellishments and I'm done.


Thanks for stopping by today.  Give this smaller scrapping size a try!

Happy Crafting!  Terri from Waving My Wand

Follow me!


Shop Your Fav Brands at Scrapbook.com

Also linking to:


#dcwv #dcwvinc #heysailor #vintagecollector #bellaarmoirre #scrapbookcom #colorbox #chalk #tcw #thecraftersworkshop #tropical #beach #summer

Thursday, July 9, 2015

Latte Love Card with WRMK Fuse and Stamplorations

How lucky am I, that I get to play with fun, crafty, pretty things?   Many of my crafty peers feel the same way.   I'm an avid fan of all things coffee and crafts and recently came into possession of these awesome stamps from Stamplorations; the large Coffee Cup stamp and the sentiment from the Latte Love set.  In taking these out for their first spin, I knew I wanted to incorporate fused pockets for the cup.  This is where it gets really fun. 
(Affiliate links below, if you care to shop.  Please see my disclaimer.)


 First, I stamped my image with clear Versamark ink and heat embossed with Ranger embossing powder on vellum, using a craft knife to trim out the upper and lower section of the cup.  I then stamped the same image onto a WRMK page protector and fused only 3 sections of the cup, leaving one side unfused, to fill with glitter and confetti and then fusing to close.  Scor-tape strips hold the fused pockets and vellum cup together and then it's all popped out with Tombow Foam strips.  Did I mention that I love my We R Memory Keepers Fuse?  You really need one.  Really, you do.

Shop Your Fav Brands at Scrapbook.com


The sentiment was also heat embossed with gold embossing powder and I've added May Arts Ribbon natural burlap string and DoubleClick Skittles embellishment bubbles.   All of this propped up on Prima Coffee Break 6x6 cardstock and a trimmed and scored DCWV textured neutral cardstock.  


from: Scrapbook.com


** You can purchase Skittles HERE - I'm using a new, not yet released color!

Dimensions: 4" x 6"


Additional supplies: Pretty Little Studio Starry Night confetti
Doodlebug Design Lily White Sugar Coating Glitter
Ranger White Embossing Powder
Ranger Gold Embossing Powder
Penblade Craft Knife
1/8" Scor-Tape


Disclosure: This post may contain affiliate links so, if you purchase a product using the link I may receive a commission. I only participate in the affiliate programs linked above because they are products that I use and love. Your purchase price is not affected in any way, by using my links. Thank you for your support and helping me keep my content free!

#stamplorations #wrmk #fuse #pocket #coffee #latte #tea #cre8time #mayartsribbon #tombow #doodlebugdesign #dcwv #prima #skittles #wavingmywand #terriburson #rangerink #ranger #penblade #coffeelovingcardmakers

Wednesday, May 6, 2015

Starting A Scrapbook Layout "About Me"

My friend Nancy suggested I start an album about me.  Actually, she suggested this a long while ago, however, I've finally decided it's time to do it.  I've been making cards for so long, I've sort of lost my "touch" with scrapping.  It wasn't until a weekend crop about a month ago, that I renewed my gusto for making layouts.  I would say it was my son who was the impetus.  Or rather, his nagging, that I get back to making layouts of his achievements.

Also, National Scrapbook Day just happened.  It's such a fun time to focus on the craft.  I plan to enter my layout into a couple fun challenges, one of which revolves around NSD.  Look for those at the end of this post and enter yourself!

Keep scrolling and I'll show you how I made this layout.  


I started by cutting some fun embellishments with my Cricut Explore and Graphic 45 papers.  I used the Floral Embellished cartridge for the designs.


I used my Tombow Dual brush pens to make watercolors on an acrylic block.


This is the technique I used, dipping a toothbrush into the color, then misting my doilies.  I also did some font writing using my Cricut to create the beauty sentiment, along with a Cricut pen in blue.  I added some Ranger Tropical Tangerine Stickles Glitter Glue as well.


What would we do without our crafty friends?  My good friend MariLynn made me some quilled flowers.  They're so tiny so I took my Tombow adhesive dots and cut them into four pieces to stick my pretty little flowers down.  It's a great way to use just a small piece, and extend your stash!


Here's a close-up of the butterfly that I cut with my Explore.  My layout background paper is Graphic 45  Time To Flourish and the butterfly is G45 Sweet Sentiments.


I've also added some pretty May Arts Ribbon.  Below, is the scalloped adhesive ribbon.  I also used the tiny floral bud adhesive ribbon, along with natural burlap string.


This definitely took some time to put together, particularly since my brain isn't functioning at full capacity by the days end, but I think I did okay.

Here are the challenges that I'm entering:


Additional supplies: Bo Bunny crochet flower, We R Memory Keepers Enamel Dots, Gold foil chevron washi tape from Hobby Lobby St. Patricks Day collection, 6" doilies from Hobby Lobby, Recollections mini enamel dots pastel, Tombow Mono adhesive Power Bond, Bic Metallic gel pen, Cricut, Prima Marketing Flower clip, foam squares

#ssswchallenge #tombow #mayartsribbon #wrmk #graphic45


Disclosure: This post may contain affiliate links so, if you purchase a product using the link I may receive a commission. I only participate in the affiliate programs linked above because they are products that I use and love. Your purchase price is not affected in any way, by using my links.  Thank you for your support and helping me keep my content free!


Sunday, April 19, 2015

Heartfelt Creations Every Day Heroes Collection Product Review

The lovely folks at Heartfelt Creations allowed me the opportunity to test and review their new paper release, Every Day Heroes and I'm so happy that they did.  This collection celebrates the every day heroes in our lives and is the perfect product to create layouts and cards that honor those heroes.  
 
 
(And, for legality purposes.... I have been compensated in product for this review.  All opinions are my own.)
 
My dad is a retired Army man and served in the Navy as well.  It's definitely a no-brainer that I will be using some of these fabulous pages to document some of his achievements.  However, I also know that amongst many paper collections, there's a silver lining; a collection that serves duality.  In other words, I could see that these papers were not just for heroes but also the perfect compliment for other special remembrances as well. 
 
With that in mind, I chose my first creation with this layout to showcase that duality, so you can see that this collection is not a one trick pony!  True, it celebrates the every day hero but it also does so much more.


I've chosen a favorite photo of my son, from a casual outdoor family wedding (please note, that is a mason jar with sweet tea in his hand. ;) 
 
I also decorated some chipboard with these papers for the striped border and the word "adore".  I'm only working with the paper collection, not the coordinating dies or stamps, therefore, I chose to get super creative with the paper, to show you other things you can do to jazz up a layout, if you are limited in budget.


I wanted to tie in more of the tan colors from the striped border, so I stenciled a section of the page with distress ink and a blending tool.
 
 
I traced my chipboard on the backside of the paper that I wanted to use, then cut with my craft knife.  To easily adhere, I ran the trimmed word through my Xyron 2.5" sticker maker. 
 I also glammed up some of the flowers by distressing with the same ink and adding dimensional glue.
 
 
Lastly, I cut one of the tags from the paper shown below.  Are you handwriting your journaling?  You should.  It not only adds a personal touch, but future generations will be able to look back, identify, and remember your handwriting.   Consider that a bonus tip!


 I hope I inspired you to utilize this collection in more ways than one.  Feel free to share your thoughts, I would really appreciate it. 
 
You can purchase this paper collection here:
 
 
I would also love it if you would visit and like/follow me on my other social media.  Thanks again, Heartfelt Creations, for letting me step into your world for a bit.


Disclosure: This post may contain affiliate links so, if you purchase a product using the link I may receive a commission. I only participate in the affiliate programs linked above because they are products that I use and love. Your purchase price is not affected in any way, by using my links. Thank you for your support and helping me keep my content free!

Wednesday, January 28, 2015

Growing In Unity - Day 3

Welcome to day 3 of my stint as the GIU (Growing in Unity) girl.  I'm showing you my creations all week long and if you comment every day on my blog post, you'll be entered into a random drawing for 25 random stamps from the Unity Stamp Company.  Wowza, 25 stamps!  
Who wouldn't love that?!  2 winners will be selected.

Today's mixed media project is titled "Grunge Love".  Love is kind of messy, right?  And, with Valentine's Day right around the corner, I thought I'd get all mushy, uh, I mean messy.  ;)


I did a whole lot of distressing to this stamped/hand-cut Unity heart  (Everything Love Jan 2014 sentiment kit) including embossing the card stock with my Cuttlebug and using Ranger embossing powder in black and white.  I sanded the raised edges a bit and then had a happy little accident with ink on my knuckle.  Haha, so I decided to add a couple more inked "knuckle" dots to my design.  The Love You sentiment is also from the same kit.
Here's a close-up of the finished heart.  Notice the inked doily?  I used my Unity Grainy background stamp, dabbed Tim Holtz Picket Fence distress ink all over my stamp, and stamped in a criss-cross pattern on a Maya Road kraft doily.  I dried it quick, with my embossing heat tool.
Come back tomorrow for more Unity inspiration! Don't forget to leave a comment here so you can qualify for the random drawing.  And for a shameless plug, I'd love if you would come and like me on FB: http://www.facebook.com/wavingmywand because when I get to 500 likes, I'm having a big giveaway!


Additional supplies: 
We R Memory Keepers - Shine Collection - 12 x 12 Paper Pad 
We R Memory Keepers - Enamel Dots - Warm - $3.59
from: Scrapbook.com
Prima Marketing flower 
Kaiserkraft wood flourish 
Colorbox archival ink Pinkolicious 
Ranger Ink - Adirondack Earthtones - Pigment Ink Pad - Pitch Black
 pearl brads 
canvas heart 
Darice Honeycomb embossing folder
Darice - Embossing Essentials - Embossing Folder Case Organizer - Black
Tim Holtz Distress Ink Pads - Brushed Corduroy 
Ranger Ink - Tim Holtz - Distress Marker - Full 49 Marker Set 
Ranger Ink - Basics Embossing Powder - White
Simplicity crochet lace 
May Arts Ribbon natural burlap string in Pink

Disclosure: This post may contain affiliate links so, if you purchase a product using the link I may receive a commission. I only participate in the affiliate programs linked above because they are products that I use and love. Your purchase price is not affected in any way, by using my links.  Thank you for your support and helping me keep my content free!

#cre8time #unitystamp #mayartsribbon #wrmk #clearsnap #timholtz #kaisercraft #love #valentine #heart